| A: |
Install System Memory
This motherboard provides three 184-pin DDR DIMM sites for memory expansion
available from minimum memory size of 128MB to maximum memory size of 2GB DDR
SDRAM (DIMM2 & DIMM3 are sharing).
Table 2-1. Valid Memory Configurations
| Bank |
Memory Module |
Total Memory |
| Bank 0, 1
(DIMM1) |
128, 256, 512MB,
1GB |
128MB ~ 1GB |
| Bank 2, 3
(DIMM2) |
128, 256, 512MB,
1GB |
128MB ~ 1GB |
| Bank 3, 2
(DIMM3) |
128, 256, 512MB,
1GB |
128MB ~ 1GB |
|
Total System Memory |
128MB ~ 2GB |
| NOTE: No hardware or BIOS setup
required after adding or removing memory modules. |
Power off the computer and unplug the AC power cord before installing or
removing memory modules.
- Locate the DIMM slot on the board.
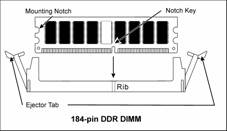
- Hold two edges of the DIMM module carefully, keep away of touching its
connectors.
- Align the notch key on the module with the rib on the slot.
- Firmly press the module into the slots until the ejector tabs at both
sides of the slot automatically snaps into the mounting notch. Do not force
the DIMM module in with extra force as the DIMM module only fit in one
direction.
- To remove the DIMM modules, push the two ejector tabs on the slot outward
simultaneously, and then pull out the DIMM module.
| ATTENTION: Static electricity can
damage the electronic components of the computer or optional boards. Before
starting these procedures, ensure that you are discharged of static
electricity by touching a grounded metal object briefly. |
|
